Getting Started
Welcome
Thank-you for buying a robot from Clearpath Robotics! We understand working with any new technology can be complicated, and robots are no exception. This page will help you get started with your new (or newly-updated) robot.
If you have problems, or have further questions, please feel free to reach out to our support team.
To jump to a specific topic please use the navigation menu to the right ➔
The information on these pages is for the ROS 2 Jazzy distribution. Use the dropdown box at the top of this page to select information for other ROS distributions.
ROS 2 Overview
In ROS 2, rather than having individual sets of packages for each
robot, we have opted to create common clearpath packages which are used by all supported platforms.
Additionally, we no longer use environment variables to customize the robot, and instead use a
YAML configuration file to describe the
robot. We have also defined a ROS 2 API common to all of our supported platforms. As a result,
our platforms are now more customizable, more modular, and more unified.
Further Reading
Please refer to our ROS 2 Cheat Sheet for a quick summary of common ROS 2 commands and package structure.
For more details about ROS 2, refer to the official ROS docs.
Terminology
Clearpath Platform: The platform refers to the vehicle that makes up the base of the robot. The platform may be referred to by the platform code to indicate the platform's model name (e.g. "Jackal" or "Husky"), or the platform's revision (e.g. "J100" or "A300").
Clearpath Robot: The robot refers to the entire robotic system, including the platform, sensors, and additional accessories.
Clearpath Config: The config refers to the robot.yaml configuration file that defines the Clearpath robot.
Clearpath API: The API refers to the ROS 2 application programming interface. This is a set of ROS 2 topics, actions, and services defined by Clearpath which are used by all supported Clearpath platforms.
How do I power my robot on?
All Clearpath robots have a power switch located on the back of the robot. The exact form-factor of this switch varies from platform-to-platform, as described below. Please refer to your robot's user manual for detailed information about the robot's power system.
The robot's internal computer powers-on with the rest of the robot. The computer may take a few minutes to fully boot, depending on how the software on the robot has been configured.
- A300, A200, R100
- J100, DX150, DX100
- W200
Husky, Ridgback, and Boxer all have a metallic button located on the back of the robot
with the ![]() (power) symbol.
Press this button to turn the robot on.
(power) symbol.
Press this button to turn the robot on.
Jackal and Dingo use the same Human-Machine Interface (HMI) panel, located on the rear of the robot.
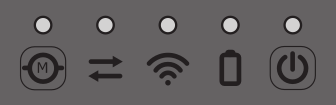
To turn the robot on, press the ![]() button. Once the robot's computer has fully booted the light under the comms indicator
(
button. Once the robot's computer has fully booted the light under the comms indicator
(![]() ) will turn green.
) will turn green.
Warthog has a red power switch located on the rear of the robot.
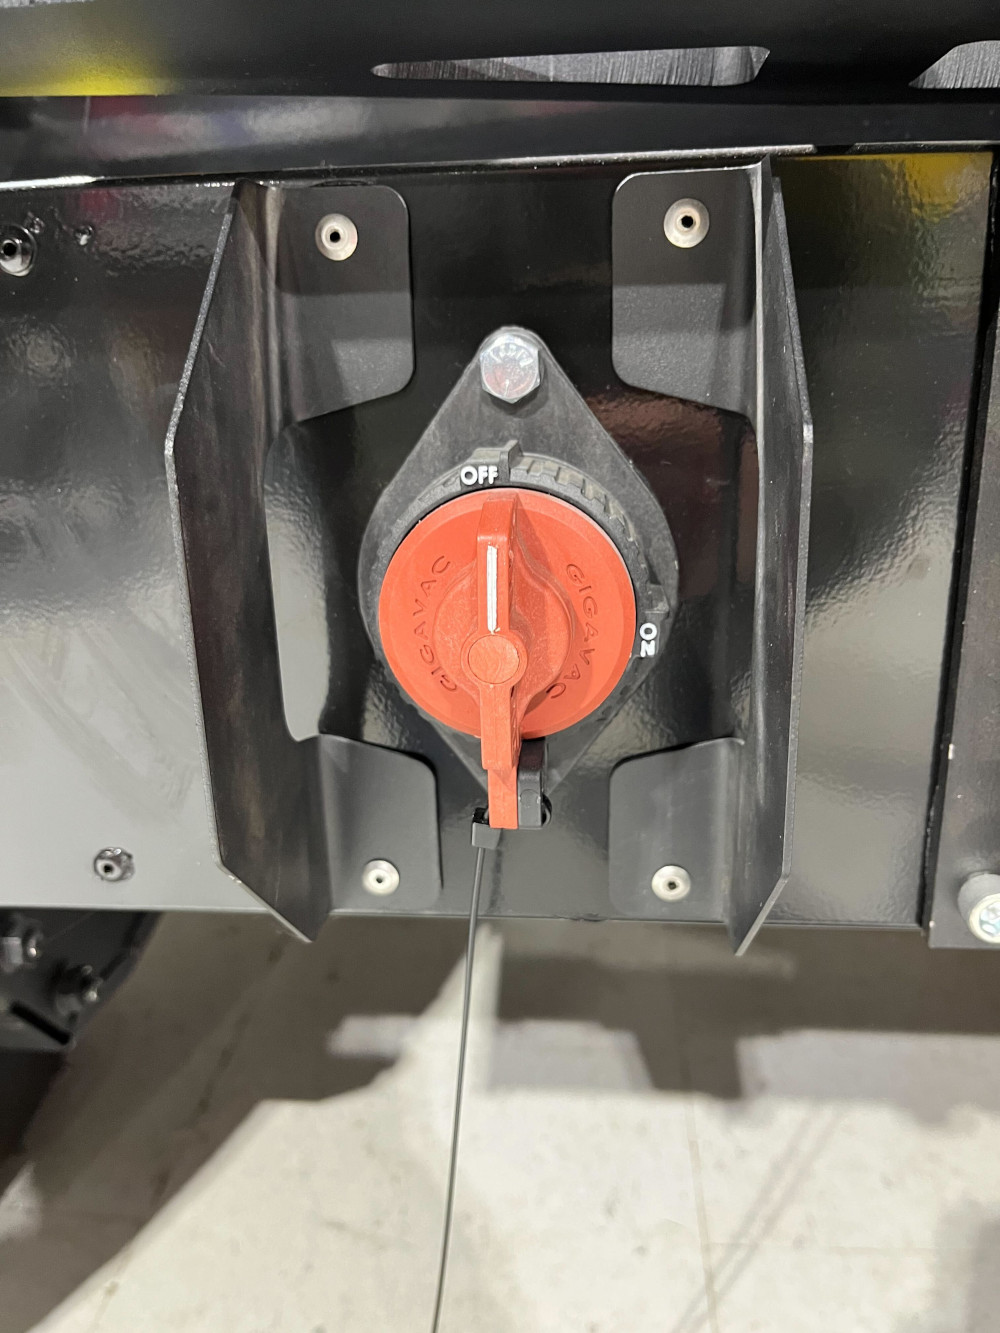
To power the robot on, rotate the switch clockwise so the white line points to the ON position.
How do I run commands in the terminal?
Clearpath robots have a text-only interface installed on them, called a "command-line interface" (or "CLI").
This interface lets you type commands to execute. By default we use the bash interpreter.
To run a command you must type the name of the program to execute usually followed by arguments that are passed to the program. Pressing the ENTER key will run the command.
How do I log into the robot?
When you turn on your robot for the first time it will not be connected to your local network. Until you connect your robot to your wi-fi you must log in by connecting a monitor and keyboard to the robot or via a direct ethernet connection as described below:
Logging in via monitor & keyboard
The easiest way to log into the robot is by connecting a monitor to the robot's computer's HDMI port and connecting a keyboard to a USB port. This will give you access to the robot's command-line. You should see white text on a black background like this:
Ubuntu 24.04.2 LTS cpr-a300-0000 tty1

cpr-a300-0000 login: _
Type the username robot and press ENTER. You will be prompted for the password:
Ubuntu 24.04.2 LTS cpr-a300-0000 tty1

cpr-a300-0000 login: robot
Password: _
Enter the password (clearpath by default, though if you changed the password, enter the new one)
and press ENTER. When typing the password you will not see any feedback (e.g. you will not see
each character replaced with *). This is normal.
Logging in via SSH
If you do not have easy access to the robot's HDMI & USB ports, you can instead use the robot's static wired network to log in via SSH. See Networking for more information on how to log in via SSH.
How do I connect the robot to my wireless network?
First you must log into the robot using a monitor and keyboard or
via SSH. Then you will need to edit /etc/netplan/60-wifi.yaml. See
conencting to an existing wifi network
for more information.
How can I copy files on to/off of the robot?
The easiest way to transfer files to/from the robot is to use SFTP. SFTP operates the much the same as SSH, but instead of allowing you to run programs with the command-line it allows you to browse and copy files.
See Networking for more information on file transfers via SFTP.
How do I control the robot?
The easiest way to control the robot is to teleoperate it using the included game controller. The following table shows the controls for all robots:
| Robot Drive Type | Platforms | Button/Axis | Action |
|---|---|---|---|
| Differential drive | Husky, Jackal, Dingo-D, Warthog, Boxer | L1 | Hold to enable slow speed |
| L2 | Hold to enable fast speed | ||
| J1 vertical | Control robot's forward/reverse velocity (up = forwards, down = backwards) | ||
| J1 horizontal | Control the robot's angular velocity (left = rotate anticlockwise, right = rotate clockwise) | ||
| Omnidirectional drive | Dingo-O, Ridgeback | L1 | Hold to enable slow speed |
| L2 | Hold to enable fast speed | ||
| J1 vertical | Control robot's forward/reverse velocity (up = forwards, down = backwards) | ||
| J1 horizontal | Control the robot's left/right velocity (left = strafe left, right - strafe right) | ||
| J2 horizontal | Control the robot's angular velocity (left = rotate anticlockwise, right = rotate clockwise) |
Controlling the robot programmatically
All Clearpath robots use a ROS 2 API for control. The following examples show some basic control operations using ROS command-line tools.
Instead of publishing to a topic using the ros2 topic pub command you can also
create a ROS node
that will publish to the same topic to control the robot.
Driving the robot
The robot's cmd_vel topic is the input the the velocity controller. Publishing to this topic
will command the robot to drive.
| Intended drive direction | Twist message value |
|---|---|
| Forwards | linear.x positive |
| Backwards | linear.x negative |
| Strafe Left | linear.y positive |
| Strafe Right | linear.y negative |
| Rotate left | angular.y positive |
| Rotate Right | angular.y negative |
Publishing to cmd_vel will force the robot to drive forwards with no feedback from any sensors.
The robot may pull on any connected cables, drive into obstacles or walls, or drive off the edge
of a staircase.
Before running this command, ensure it is safe to drive the robot. We recommend having a scond person nearby to monitor the robot and engage the emergency stop if necessary.
To command the robot to drive open a terminal and run the following command, replacing a300_0000 with your robot's
serial number (using an underscore _ instead of a hyphen -):
ros2 topic pub /a300_0000/cmd_vel geometry_msgs/TwistStamped '{"twist":{"linear":{"x": 0.2}}}' -r 10
This will command the robot to drive forwards at 0.2m/s (0.72 km/h or 0.45mph). To stop the robot press ctrl + c.
To rotate the robot you can specify an angular velocity in rad/s:
ros2 topic pub /a300_0000/cmd_vel geometry_msgs/TwistStamped '{"twist":{"angular":{"z": 0.35}}}' -r 10
This will command the robot to rotate anticlockwise at 0.35rad/s (approximately 20 deg/s). To stop the robot press ctrl + c.
If your robot has an omni-directional drive (e.g Ridgeback, Dingo-O) you can also command it to
drive sideways by specifying the linear.y velocity:
ros2 topic pub /a300_0000/cmd_vel geometry_msgs/TwistStamped '{"twist":{"linear":{"y": -0.2}}}' -r 10
This will command the robot to drive to the right at 0.2m/s (0.72 km/h or 0.45mph). To stop the robot press ctrl + c.
Controlling the robot's lights
If your robot has controllable corner lights (e.g. Husky A300, Ridgeback, Dingo-O or Dingo-D) you can
control the the colour of these lights by publishing to the platform/cmd_lights topic.
To turn all the lights off, run the following command:
ros2 topic pub /a300_0000/platform/cmd_lights clearpath_platform_msgs/Lights '{"lights":[
  {"red": 0, "green": 0, "blue": 0},
  {"red": 0, "green": 0, "blue": 0},
  {"red": 0, "green": 0, "blue": 0},
  {"red": 0, "green": 0, "blue": 0},
]}' -r 10
You can experiment with sending different RGB values to each light, for example to set one light to yellow and keep all others off:
ros2 topic pub /a300_0000/platform/cmd_lights clearpath_platform_msgs/Lights '{"lights":[
  {"red": 0, "green": 0, "blue": 0},
  {"red": 255, "green": 255, "blue": 0},
  {"red": 0, "green": 0, "blue": 0},
  {"red": 0, "green": 0, "blue": 0},
]}' -r 10
Dingo-O and Husky have 4 lights while Ridgeback has 8. See Lights.msg
for details on the order of each light within the lights array.
Certain conditions, such as being e-stopped, charging, or having a low battery will override the user-controlled lights.
Generally, as long as the robot's front lights are white and rear lights are red the robot is in a "normal" state and the lights can be controlled.
How do I set up my remote workstation to work with the robot?
We recommend setting up a dedicated computer with Ubuntu 24.04 installed on it. To set up your offboard computer, please follow these instructions.
ROS 2 requires time synchronization between the offboard computer and the robot. You may need to configure NTP synchronization on your workstation and/or robot.
How do I run the simulator?
First, set up your computer to install ROS 2 Jazzy. Then install the simulation.
Once the simulator is installed, you can start simulating.
How can I visualize the robot?
The clearpath_viz ROS package contains launch files for visualizing the robot's model and
sensor data. See Visualizing with RViz2 for more information.
How do I (re)configure the robot?
All Clearpath robots use a single configuration file,
/etc/clearpath/robot.yaml. This file
contains the platform information, as well as the type and location of all of the robot's
sensors and manipulators.
To add/remove/relocate sensors, change the robot's speed & acceleration parameters, change the ROS Middleware, or add custom launch files and nodes to the startup services, edit this file:
nano /etc/clearpath/robot.yaml
The robot.yaml file is processed by generator services. These
generators parse the YAML file and create the robot's
physical description,
semantic description,
launch files for
the platform and sensor drivers, and other configuration files.
The generator services include a live reconfiguration tool that will automatically restart ROS
nodes and services when robot.yaml is edited. This automatically applies any changes you make
to the configuration without the need to manually restart anything.
If you accidentally make invalid changes to robot.yaml the generator services will automatically
fall-back to a copy of the last working version of robot.yaml.
How can I add custom URDFs to my robot using robot.yaml?
robot.yaml provides a platform.extras.urdf field
that can be used for adding user-created URDF files to the robot_description.
How to I create a workspace for development?
See Creating a Workspace for instructions on how to create a workspace.
For help creating custom ROS packages, see Customization Package.